
I had stopped repairing ATX power supply many years back due to the new one cost very cheap. It’s not worth to repair it because the spare parts sometimes were much more expensive than getting a new power supply. Searching for ATX power supply spare parts was not easy as many of them you can’t even find them on the internet. Not only that, many complicated and different designed by power supply manufacturers had eaten up our precious troubleshooting time too because of we need time to understand how all these different designed power supply work.
Some of the power supply designs were using the PWM IC (UC3842) and power FET, some use the double transistors while some use only a single power IC in the primary side. Because of the manufacturers wants the design to be made into compact size, many secondary or even primary power supply circuit were build into a modular board (smaller board). This made troubleshooting even more difficult because many times the meter’s probe can’t reach to the testing point.
The real reason why I had stopped repairing ATX power supply was the profit margin. If you charge to high the customers rather buy a new unit with one year warranty given. If you charge too low, you may end up in the losing side because of the components replaced, electricity and etc. If you charge reasonable, the profit margin gained can’t even cover your time spent on troubleshooting it. I’m here not to discourage you to stop repairing ATX power supply, however if you have the time, have contacts getting cheap power supply components, easy to access many power supply schematic diagrams and etc then you may go ahead to repair it.
Okay back to the article, one of my customers had asked me to repair his ATX power supply. I told him to get a new one (since it was very cheap) but he said he couldn’t find one that suits his customer’s CPU. He wanted a power supply that is either same size or smaller then the original one with same or higher specification but all he could find was a standard size power supply!

As a favors to my customer, I would do my best to help him to repair the ATX power supply. When the power supply was switch on, measurements were taken. The results were over voltage. The 12 volts line shot up to 13 + volt and the 5 volts line became 5.6 volts. After the casing was removed, I found the inside was very dirty and I used a vacuum cleaner and a brush to clean off the dirt. Then I saw four filter electrolytic capacitors had bulged at the top casing.


As you know, we as electronic repairers can’t just see things at only one side; we have to see the other sides too. What I mean was, try to see if there are any suspicious components that contributed to the failure of the power supply such as broken components, dry joints, loose connection, decay glue and etc before start checking the suspected area.

What I saw was at the primary side there were some components covered with decayed glue as seen in the picture. I have to carefully remove it by scrapping off the layers of the decayed glue while preserving the outer layers of the components. Once it was done, I clean it with the Thinner solution. Decayed glue could cause serious or intermittent problem in electronic equipment because it can be conductive.

If you repair any ATX power supply, make sure you check the fan too because some power supply failure was due to heat caused by a faulty fan. The purpose of the fan is to suck out all the heat generated by the components inside the power supply. In order for the fan to run smooth, you can service it by using a Philips oil base spray as shown in the photo.

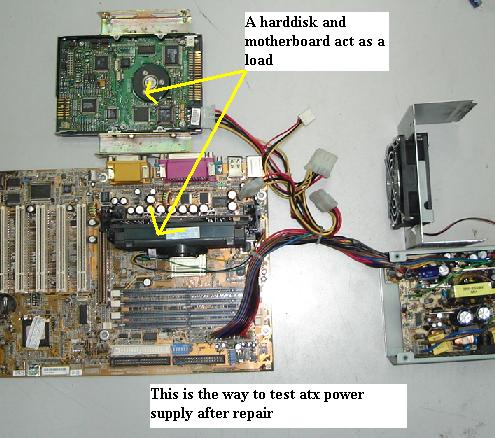
Once the four electrolytic capacitors were replaced and the decayed glue removed, I then have to plug it into a junk motherboard together with a hard disk to test the performance of the ATX power supply and measure all of its output voltages. It seems like the output voltages were back to normal. Once everything is okay I then test it in a working CPU to check for the display.

The reason I test it with a junk motherboard first as a way not to cause my good motherboard to go bad just in case if the output voltages is still very high. Better safe than regret later. By the way you can’t test a power supply without load otherwise it may turned on for a while and then shut down. If you do not have a junk motherboard you can always at least connect a hard drive and a wire jumper to its connector to turn on the ATX power supply.

Do you know that most ATX power supply is using dual Schottky barrier rectifiers to convert the ac wave into DC voltages? Even in LCD Monitor power supply, a dual Schottky were used in the rectification too. For your information, checking Schottky diode is different from checking a normal diode. With analog meter set to X10 K ohms, it should show some leakage reading when doing the reverse bias test. If this component becomes faulty it is very easy to get a replacement, of course you have to get one with the right specification. That’s all for today, hope you enjoy the article and come back more often to check out for any latest repair techniques that I’m going to share to you.


hiii
ReplyDeleteHi all,
ReplyDeleteATX-standard power supplies are relatively inexpensive and will work in all mid to full-sized desktop computers sold today. If your computer uses multiple CD or hard drives or features a powerful graphics card, you need a power supply with more than 500 watts of available power. Thanks a lot!
Redundant Power Supply
Thank you for some other informative website. The place else may just I get that kind of information written in such a perfect method? I have a venture that I am simply now running on, and I’ve been at the glance out for such info. dell power supply
ReplyDeleteJust admiring your work and wondering how you managed this blog so well. It’s so remarkable that I can't afford to not go through this valuable information whenever I surf the internet! GE, KitchenAid, Dacor, Viking, Wolf, KitchenAid, Ovens Repair in SANTA MONICA
ReplyDelete