Friday, December 10, 2010

LASER PRINTER


Laser Printers:
A type of printer that utilizes a laser beam to produce an image on a drum. The light of the laser alters the electrical charge on the drum wherever it hits. The drum is then rolled through a reservoir of toner, which is picked up by the charged portions of the drum. Finally, the toner is transferred to the paper through a combination of heat and pressure. This is also the way copy machines work.
Because an entire page is transmitted to a drum before the toner is applied, laser printers are sometimes called page printers. There are two other types of page printers that fall under the category of laser printers even though they do not use lasers at all. One uses an array of LEDs to expose the drum, and the other uses LCDs. Once the drum is charged, however, they both operate like a real laser printer.
In most cases, your PC talks with controller circuitry (1) in your laser printer to queue up and translate printing data; a raster image processor (RIP) converts images and text into a virtual matrix of tiny dots.

The main actor, however, is the photoconduction drum (2), a specially coated cylinder that receives a positive or negative charge from a charging roller (3) (or, in some printers, a corona wire). A laser beam(4), switching rapidly on and off and deflected off a rotating mirror(5), scans the charged drum horizontally in precise lines. When the beam flashes on, it reverses the charge of tiny spots on the drum, corresponding to dots that are to be printed black. After the laser scans a line, a stepper motor advances the drum, and the laser repeats the process—all, of course, blindingly fast.

Next, the drum's laser-kissed portion encounters the developer roller(6), which is coated in charged toner particles from the toner hopper(7), part of the toner cartridge. Charged toner clings to the discharged areas of the drum, reproducing, in reverse, your images and text.

Meanwhile, a belt or roller assembly (8) draws paper inside from the paper tray (9), past a transfer roller or charging wire(10) that applies a charge opposite the toner's to the paper. As the paper sheet meets the drum, the drum-borne toner transfers to paper. A cleaning blade (11) then cleans the drum, and the process continues in a smooth, circular flow. (Color lasers work similarly, but the paper may require four passes by the drum for four toner colors. Alternately, the printer may transfer each color layer to an intermediate belt before applying it to the paper, or employ four drum/toner assemblies.)

Last, your page, with its imprint of tenuously anchored toner, reaches the fuser (12)—a heat roller and a pressure roller. It melts the toner, which contains resins and sometimes wax, onto the page. Voila, pages in your out tray.

History
In 1975, IBM introduced the first laser printer, the model 3800. Later, Siemens came out with the ND 2 and Xerox with the 9700. These self-contained printing presses were online to a mainframe or offline, accepting print image data on tape or disk.
In 1984, HP introduced the LaserJet, the first desktop laser printer, which rapidly became a huge success and a major part of the company's business. Desktop lasers made the clackety daisy wheel printers obsolete, but not dot matrix printers, which are still widely used for labels and multipart forms.


The Laser Mechanism
The laser printer uses electrostatic charges to (1) create an image on the drum, (2) adhere toner to the image, (3) transfer the toned image to the paper, and (4) fuse the toner to the paper. The laser creates the image by "painting" a negative of the page to be printed on the charged drum. Where light falls, the charge is dissipated, leaving a positive image to be printed.


Saturday, November 27, 2010

Inkjet Printer


 INKJET PRINTER
A type of printer that works by spraying ionized ink at a sheet of paper. Magnetized plates in the ink's path direct the ink onto the paper in the desired shapes. Ink-jet printers are capable of producing high quality print approaching that produced by laser printers. A typical ink-jet printer provides a resolution of 300 dots per inch, although some newer models offer higher resolutions.
An inkjet printer is any printer that places extremely small droplets of ink onto paper to create an image. If you ever look at a piece of paper that has come out of an inkjet printer, you know that:
·        The dots are extremely small (usually between 50 and 60 microns in diameter), so small that they are tinier than the diameter of a human hair (70 microns)!
·        The dots are positioned very precisely, with resolutions of up to 1440x720 dots per inch (dpi).
·        The dots can have different colors combined together to create photo-quality images.

Inside an Inkjet Printer

 Parts of a typical inkjet printer include:
·     Print head assembly
·     Print head - The core of an inkjet printer, the print head contains a series of nozzles that are used to spray drops of ink.

The print head assembly


·        Ink cartridges - Depending on the manufacturer and model of the printer, ink cartridges come in various combinations, such as separate black and color cartridges, color and black in a single cartridge or even a cartridge for each ink color. The cartridges of some inkjet printers include the print head itself.

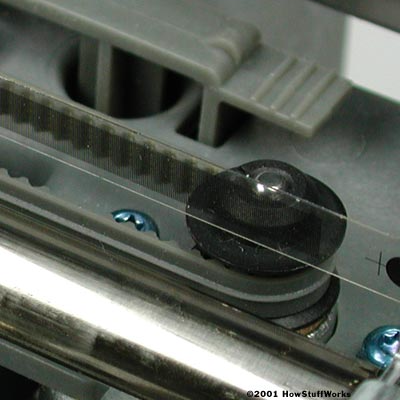
·        Print head stepper motor - A stepper motor moves the print head assembly (print head and ink cartridges) back and forth across the paper. Some printers have another stepper motor to park the print head assembly when the printer is not in use. Parking means that the print head assembly is restricted from accidentally moving, like a parking brake on a car.

Stepper motors like this one control the movement of most parts of an inkjet printer.

  •   Belt - A belt is used to attach the print head assembly to the stepper motor.
  • Stabilizer bar - The print head assembly uses a stabilizer bar to ensure that movement is precise and controlled.


Here you can see the stabilizer bar and belt.

·   Paper feed assembly

·        Paper tray/feeder - Most inkjet printers have a tray that you load the paper into. Some printers dispense with the standard tray for a feeder instead. The feeder typically snaps open at an angle on the back of the printer, allowing you to place paper in it. Feeders generally do not hold as much paper as a traditional paper tray.
·        Rollers - A set of rollers pull the paper in from the tray or feeder and advance the paper when the print head assembly is ready for another pass.

The rollers move the paper through the printer.


·    Paper feed stepper motor - This stepper motor power the rollers to move the paper in the exact increment needed to ensure a continuous image is printed. 


·        Power supply - While earlier printers often had an external transformer, most printers sold today use a standard power supply that is incorporated into the printer itself.

·        Control circuitry - A small but sophisticated amount of circuitry is built into the printer to control all the mechanical aspects of operation, as well as decode the information sent to the printer from the computer.

The mechanical operation of the printer is controlled by a small circuit board containing a microprocessor and memory.


·        Interface port(s) - The parallel port is still used by many printers, but most newer printers use the USB port. A few printers connect using a serial port or small computer system interface (SCSI) port.

While USB taking over, many printers still use a parallel port.


Heat vs. Vibration

Different types of inkjet printers form their droplets of ink in different ways. There are two main inkjet technologies currently used by printer manufacturers:


View of the nozzles on a thermal bubble inkjet print head

·        Thermal bubble - Used by manufacturers such as Canon and Hewlett Packard, this method is commonly referred to as bubble jet. In a thermal inkjet printer, tiny resistors create heat, and this heat vaporizes ink to create a bubble. As the bubble expands, some of the ink is pushed out of a nozzle onto the paper. When the bubble "pops" (collapses), a vacuum is created. This pulls more ink into the print head from the cartridge. A typical bubble jet print head has 300 or 600 tiny nozzles, and all of them can fire a droplet simultaneously.


·        Piezoelectric - Patented by Epson, this technology uses piezo crystals. A crystal is located at the back of the ink reservoir of each nozzle. The crystal receives a tiny electric charge that causes it to vibrate. When the crystal vibrates inward, it forces a tiny amount of ink out of the nozzle. When it vibrates out, it pulls some more ink into the reservoir to replace the ink sprayed out.

Inkjet head design

There are two main design philosophies in inkjet head design: fixed-head and disposable head. Each has its own strengths and weaknesses. Most inkjets are used for photo printing.


Fixed head

The fixed-head philosophy provides an inbuilt print head (often referred to as a Gaither Head) that is designed to last for the life of the printer. The idea is that because the head need not be replaced every time the ink runs out, consumable costs can be made lower and the head itself can be more precise than a cheap disposable one, typically requiring no calibration. On the other hand, if a fixed head is damaged, obtaining a replacement head can become expensive if removing and replacing the head is even possible. If the printer's head cannot be removed, the printer itself will then need to be replaced.

Fixed head designs are available in consumer products but are more likely to be found on industrial high-end printers and large format plotters. In the consumer space, fixed-head printers are manufactured primarily by Epson and Canon. Hewlett-Packard also offers a few fixed-head models, such as the HP Photosmart 3310. Industrial fixed-head print heads are manufactured by these companies: Kodak Versamark, Trident, Xaar, Spectra (Dimatix), Hitachi / Ricoh, HP Scitex, Brother, Konica Minolta, Seiko Epson, and ToshibaTec (a licensee of Xaar)[citation needed].

Inkjet heads:
Disposable head (left) and
Fixed head (right) with ink cartridge (middle)

Disposable head


The disposable head philosophy uses a print head which is supplied as a part of a replaceable ink cartridge. Every time a cartridge is exhausted, the entire cartridge and print head are replaced with a new one. This adds to the cost of consumables and makes it more difficult to manufacture a high-precision head at a reasonable cost, but also means that a damaged print head is only a minor problem: the user can simply buy a new cartridge. Hewlett-Packard has traditionally favored the disposable print head, as did Canon in its early models. This type of construction can also be seen as an effort by printer manufacturers to stem third party ink cartridge assembly replacements, as these would-be suppliers don't have the ability to manufacture specialized print heads.

An intermediate method does exist: a disposable ink tank connected to a disposable head, which is replaced infrequently (perhaps every tenth ink tank or so). Most high-volume Hewlett-Packard inkjet printers use this setup, with the disposable print heads used on lower volume models.

Canon now uses (in most models) replaceable print heads which are designed to last the life of the printer, but can be replaced by the user if they should become clogged. For models with "Think Tank" technology, the ink tanks are separate for each ink color.

Inkjet Printer and Bubble Jet Printer

The inkjet printer technology was originally invented by Canon. It is based on the principle that a heated fluid produces bubbles.
The researcher who discovered this had accidentally brought a syringe filled with ink into contact with a soldering iron. This created a bubble in the syringe that made the ink in the syringe shoot out.
Today's printer heads are made up of several nozzles (up to 256), equivalent to several syringes, which are heated up to between 300 and 400°C several times per second.
Each nozzle produces a tiny bubble that ejects an extremely fine droplet. The vacuum caused by the decrease in pressure creates a new bubble.

Generally, we make a distinction between the two different technologies:
·        Inkjet printers use nozzles that have their own built-in heating element. Thermal technology is used here.
·        Bubble jet printers use nozzles that have piezoelectric technology. Each nozzle works with a piezoelectric crystal that changes shape when excited by its resonance frequency and ejects an ink bubble.

Color inkjet printers advantages: Compared to previous consumer-oriented color printers (i.e. dot matrix printers), inkjet printers are quieter and can print finer so that many photographic-quality color inkjet printers are now widely available. Compared to more expensive technologies, they don’t need to worm up and prints have a lower cost per page. The price of ink-jet printers is lower than that of laser printers

Color inkjet printers disadvantages: Ink cartridges are often expensive. Plus, most manufacturers embed an “intelligent” microchip in the cartridges which prevents from printing when it claims the cartridge is “empty”, as an attempt to avoid cartridge refill. As a result, they print up to 30% less then without the chip. The lifetime of aqueous based ink prints is quite limited. Another drawback of ink-jet printers is that they require a special type of ink that is apt to smudge on inexpensive copier paper.


Friday, November 19, 2010

Sadiq's Blog: How to Use God Mode in Windows 7 ?

Sadiq's Blog: How to Use God Mode in Windows 7 ?: "How to Use God Mode in Windows 7Windows 7 is now becoming popular among windows operating system users.Windows 7 has cool hidden feature ,p..."

How to Use God Mode in Windows 7 ?

How to Use God Mode in Windows 7
Windows 7 is now becoming popular among windows operating system  users.Windows 7 has cool hidden feature ,people calls it God mode in windows 7.GodMode is a folder that brings together a long list of customization settings allowing you to change all your settings from one place.This is very good as you can now change all your windows settings from one single place.


Follow the following steps to create god mode folder:
1. Create a new folder
2. Rename the folder to GodMode.{ED7BA470-8E54-465E-825C-99712043E01C}
You can change word GodMode to any other word you like your name or your friends name

3.The folder icon will change ,then  double click it to show the GodMode windows options.


Sunday, October 31, 2010

Sadiq's Blog: Installing a CD or DVD Drive

Sadiq's Blog: Installing a CD or DVD Drive: "PreparationSo you want to install a CD drive? Well the first thing you need to do is have a CD/DVD drive to install. So why not go to my p..."

Installing a CD or DVD Drive


Preparation

So you want to install a CD drive? Well the first thing you need to do is have a CD/DVD drive to install. So why not go to my page on CD drives and consider what drive you need.

Do you need a SATA or IDE drive? Do you want a DVD burner or a CD Burner? Does it need to play all type of DVDs? Do you need a blu-ray drive? These and more are the questions you need to ask yourself before you choose your drive.

Locating the CD/DVD drives

The next step in this tutorial on installing a CD drive is to locate the CD drives on the computer case. The way to do this is to remove any cables that you may have attached, open up the case and take a peak inside. I would recommend that you wear an antistatic wrist strap while doing all this.

So once the case is opened take a look and hopefully you will find something that looks similar to the photo below.


Setting the Jumpers

This step is probably the most difficult step in the entire tutorial. However the newer SATA CD/DVD drives do not require you too set the jumpers so if you are using a SATA drive, you can skip this whole step. However if you are using IDE drives then you will need to set the jumpers.

To work out where the jumpers need to go you need to ask this question. How many drives (including hard drives) do you want to have in the computer?

If you only have two drives then you can leave the jumpers as default and just put each drive on a different cable. For example: One hard drive on one IDE cable and one CD drive on another IDE cable.

However if you want to have three or four drives then it is necessary to have two drives on the one IDE cable and then you need to set one drive as master and another as slave.

The image below should help you identify where the jumpers are on an IDE CD/DVD drive.

Inserting the CD/DVD Drive

This step is the actual installing of the CD drive. So take the drive place it in its slot and push it in. Put the screws in place and your done.

Installing the IDE cables

In this step we are simply connecting the cables from the motherboard and the power supply to the CD/DVD drive. The cables from the motherboard will either be the SATA cable or theIDE Cable. And the power cable will either be the normal peripheral power cable or the SATA power cable. So if you are using an IDE CD drive then you will use the IDE cables and those with the SATA drives will use SATA cables.


In the images I will be using the IDE cables but connecting SATA cables is very easy so you should have no problems.

Connecting the IDE Cable

installing the ide cable

To connect the IDE cable simply place the IDE cable in the motherboard (like the image shows) and place one of the other ends into the CD/DVD drive.

Often the IDE cable will only go in one way.

Note - SATA cable users: The sata cable is very easy to install. It will only go in one way and you can see the SATA ports on the right (the red ports) in the image.


When inserting the IDE cable into the CD/DVD drive always place the red wire of the IDE cable closer to the power cable.


Connecting the Power Cables

The next step in this tutorial on installing a hard drive is to connect the peripheral power cables. These will only ever go in one way and you can find a tutorial with images here.

Peripheral Power Cable (4 Pin)

 A peripheral power cable is used to connect the older IDE hard drives and cd/dvd drives to the power supply. There are four cables (1 yellow, 2 black and 1 red). Sometimes there are eight cables, this happens when there is another cable coming out of it to connect to another hard drive or cd drive.


These peripheral power connectors were the original power cables in a computer and were used most commonly for hard drives or cd drives. However, they are sometimes used in an array of tasks in the computer: additional motherboard power, video card power, fans, lighting etc.

This cable is commonly called the 4 pin molex power cable, but this can be confused with the 4 pin main power cable which is a molex cable too. This power cable can sometimes be found with only two cables. This version of the power cable is for fans in the case so do not attach it to your hard drive or cd drive.

The picture above explains how to install the peripheral power connector into a hard drive. To see a photo of the cable being connected to a cd drive click here.

The first step to connecting power to a hard drive is identifying the 4-pin peripheral cable. Next get the hard drive you are connecting to and place the power cable inside the hard drive like the photo demonstrates. The power cable will only go in one way and the yellow cable(s) will be closest to the edge of the hard drive.

Friday, October 29, 2010

BLOGING

What Does Blog Stand For

 Every person who uses the Internet today knows what a blog is, but have you ever wondered what does blog stand for? There have been various full forms that have been suggested for blogs, but the original meaning is said to be 'Web Log'. This term was coined in the year 1997 by John Barger. 


Today people are completely familiar and comfortable with the term blog and what it represents. It is an online journal of sorts that has given millions of people around the globe an opportunity to explore their creative writing abilities. If you still do not know what does blog stand for and what it does, let me tell you that it is a revolution that has changed the literary habits of the world, and has brought every single person that little bit closer. 

People love making journals and memoirs about their lives, their travels, their aspirations, or simply about their thoughts. Becoming a writer meant that you needed an exemplary command over words and the English language, and the ability to sweep people off their feet with your lengthy narrations of purple prose. But high speed Internet has changed everything. Shorter, smaller and faster was the new mantra, and blogging took the world by storm. It paved the way for individuals of moderate literary talents to get their work published and viewed by millions around the world, and gave them a platform for 'creative expression'. 

What Does Blog Stand For?

For people who are new to the world of the Internet, the term blog holds a lot of mystery and fascination. Though originally the word blog was coined to imply 'Web Log', over the years there are many more acronyms that the term has been associated with. Here are a few more acronyms that the term blog stands for.
  • Better Listings on Google
  • Big Load of Gossip
  • Boring Lump of Garbage
  • Boring Lessons on Galaxy
  • Biological Links on the Globe
  
  Going through these supposed acronyms, one can see that the term blog is not something that is related to serious literature. Of course, there are few individuals who make use of this platform for very good purposes, but all in all, this platform has disturbed the equilibrium of genuine content. There are no regulations regarding the material that can be published on a blog, and as a result you will come across a lot of incoherent and inconsequential gibberish on most blogs. People will argue that this gives the world a stage to express themselves, but I want to know what use is it to me to read about what a teenage girl in Tokyo ate for breakfast today, and how her mood is. This is all 'chatter' (useless noise), which the Internet is guilty of inventing. So what does blog stand for? That depends on your perception. 

History of Blogging

When the Internet first began functioning, starting a new webpage was a tedious process and took plenty of time. As time went by this process got easier and shorter, and pretty soon it was just a matter of a click. The history of blogging tells the story of how it has become easier and simpler to start your own webpage, and even your own website. After the term was coined in 1997, it was regularly used in circles that were familiar with the Internet. 

In 1999, Peter Merholz, broke down the term web log into 'we blog'. This soon became the rage and the term began to be used more as a verb. To blog now came to mean to create or edit your web log. The use of these terms was so widespread and common now, that by 2003 the Oxford English Dictionary had to include it in their new version. Pyra Labs created a software known as Blogger, which was subsequently purchased by Google, and this interface made it possible for everyone with Internet access to create their own blog. 

Read more on:
Now, what does blog stand for? It stands for the advent of Internet technology at such an alarming rate that we are constantly trying to catch up. It stands for a platform where there are no barriers and no regulators and moderators and other forms of Internet censorship. You're free to write what you please, and it is the choice of the reader if they read it or ignore it. The power is ultimately in your hands though, and what you do with it is completely your call.

Sadiq's Blog: Tips and Tricks

Sadiq's Blog: Tips and Tricks: "Tips to earn money from internet
How to download YouTube and Facebook videos without any tools..?"

Assignments & Projects

Tuesday, October 26, 2010

Sadiq's Blog

Sadiq's Blog

Tips And Tricks To Earn Money From Hotfile (Complete Guide )

This post is a complete guide on how to start earning money from home with hotfile.Now,In this I would not let any stone unturned and will tell you each and every best step to earn money from hotfile.If you follow this guide then there is no reason that you wont be able to earn from hotfile.Before starting the complete step by step tutorial on Tips and Tricks to earn money money from hotfile let me give a brief introduction of hotfile.

Hotfile is a filesharing website that pays the uploaders for their file downloads.This is a trusted and genuine website and always pays on time.The best feautre is the Remote Uploading i.e you wont have to upload files by yourself,you can also upload files from other sites.So, if you have a slow internet connection then also there is not a big problem.Hotfile is free to register.


Here is the payment proof from hotfile

1. Goto hotfile and register.Its completely free.Click Here to go to hotfile
2.Register a account.After registration Login into your hotfile account.
3.     Now click on Remote upload.

4. Remember always try to upload content which is not easily available or in high demand.Like latest released hollywood movies or Video songs or Tv shows or Some Templates or Games(All these things have a very high Demand)
5. To remote upload it is required that the files are stored in mediafire server.And it is quite easy to find files on mediafire.Click Here For the guide on how to search files on mediafire.
6. Now I will show you how to remote upload on hotfile from mediafire.
7. Enter the mediafire url of the file in your browser.
8. Now right click on Click here to download file and click on copy link location.


10. After you have eneterd all the urls click on upload.
11.It will only take 2-3 minutes to upload all your files.


12. We recommend you to upload files greater then 100 mb becuase you will earn more and more if the file size is large.Below is the earnings according to file size.

13. After succesful upload you will get your links for the uploaded files.Copy these links and paste them in notepad.
Now here is the big problem resolved i.e promotion of these links.
The best way to promote your download links is the use of warez forums.These are huge source of downloads but you will only get the downloads if and only if you have something that is not easily available or is in high demand.
If you have Some warez like movies, games or softwares etc that you have uploaded on hotfile and want to promote these links then here are some of the best forums where you can share your links.
Register on all of the above forums and post your threads in relevant sections of the forums.
(We reccomend you to build your own huge forum list where you can share you files in addtion to the above forums)
Now here is the step by step guide on how to make you post attrative an get huge downloads.
Three things to know for posting:
1- Whatever you post, it should have an image.You can post images to free image hosting sites like. tinypic or imageshack etc.you will get the code of your image after uploading.Image code will be as:
[IMG]IMAGE LINK[/IMG]
2- You will have to add a little description about your file.For movies you can try imdb.com, softwares do have a description in the Help–>about page.you can copy.while description is not necessary in music videos, wallpapers etc.youR description should be enclosed by quote tag as
[QUOTE]your description[/QUOTE]
3- After you upload your file, you will get a link. link shall be enclosed by tag code as:
[CODE]your link[/CODE]
NOTE:If you have a good internet connection then we reccomend you to download latest movies or softwares or games as soon as they are available on torrents and manually upload them on hotfile.This will give you a huge edge over others becuase you will be the only one who is currently sharing that file and you will get very huge amount of downloads.


Sadiq's Blog: NOTEPAD ACTION - Format your derive using Notepad

Sadiq's Blog: NOTEPAD ACTION - Format your derive using Notepad : Formatting hard drives is nothing new, doing so with notepad is someth...