Showing posts with label Stay connected with this blog and please leave comment for improvement. Show all posts

Tuesday, May 24, 2011

What is Hardware?

Your PC (Personal Computer) is a system, consisting of many components. Some of those components, like Windows XP, and all your other programs, are software. The stuff you can actually see and touch, and would likely break if you threw it out a fifth-story window, is hardware.

Not everybody has exactly the same hardware. But those of you who have a desktop system, like the example shown in Figure 1, probably have most of the components shown in that same figure. Those of you with notebook computers probably have most of the same components. Only in your case the components are all integrated into a single book-sized portable unit.


Figure 1


The system unit is the actual computer; everything else is called a peripheral device. Your computer's system unit probably has at least one floppy disk drive, and one CD or DVD drive, into which you can insert floppy disks and CDs. There's another disk drive, called the hard disk inside the system unit, as shown in Figure 2. You can't remove that disk, or even see it. But it's there. And everything that's currently "in your computer" is actually stored on that hard disk. (We know this because there is no place else inside the computer where you can store information!).


Figure 2

The floppy drive and CD drive are often referred to as drives with removable media or removable drives for short, because you can remove whatever disk is currently in the drive, and replace it with another. Your computer's hard disk can store as much information as tens of thousands of floppy disks, so don't worry about running out of space on your hard disk any time soon. As a rule, you want to store everything you create or download on your hard disk. Use the floppy disks and CDs to send copies of files through the mail, or to make backup copies of important items.

Random Access Memory (RAM)

There's too much "stuff" on your computer's hard disk to use it all at the same time. During the average session sitting at the computer, you'll probably use only a small amount of all that's available. The stuff you're working with at any given moment is stored in random access memory (often abbreviated RAM, and often called simply "memory"). The advantage using RAM to store whatever you're working on at the moment is that RAM is very fast. Much faster than any disk. For you, "fast" translates to less time waiting and more time being productive.

So if RAM is so fast, why not put everything in it? Why have a hard disk at all? The answer to that lies in the fact that RAM is volatile. As soon as the computer is shut off, whether intentionally or by an accidental power outage, every thing in RAM disappears, just as quickly as a light bulb goes out when the plug is pulled. So you don't want to rely on RAM to hold everything. A disk, on the other hand, holds its information whether the power is on or off.

The Hard Disk

All of the information that's "in your computer", so to speak, is stored on your computer's hard disk. You never see that actual hard disk because it's sealed inside a special housing and needs to stay that way. Unlike RAM, which is volatile, the hard disk can hold information forever -- with or without electricity. Most modern hard disks have tens of billions of bytes of storage space on them. Which, in English, means that you can create, save, and download files for months or years without using up all the storage space it provides.
In the unlikely event that you do manage to fill up your hard disk, Windows will start showing a little message on the screen that reads "You are running low on disk space" well in advance of any problems.  In fact, if that message appears, it won't until you're down to about 800 MB of free space. And 800 MB of empty space is equal to about 600 blank floppy disks. That's still plenty of room!

The Mouse

Obviously you know how to use your mouse, since you must have used it to get here. But let's take a look at the facts and buzzwords anyway. Your mouse probably has at least two buttons on it. The button on the left is called the primary mouse button, the button on the right is called the secondary mouse button or just the right mouse button. I'll just refer to them as the left and right mouse buttons. Many mice have a small wheel between the two mouse buttons, as illustrated in Figure 3.


Figure 3

The idea is to rest your hand comfortably on the mouse, with your index finger touching (but not pressing on) the left mouse button. Then, as you move the mouse, the mouse pointer (the little arrow on the screen) moves in the same direction. When moving the mouse, try to keep the buttons aimed toward the monitor -- don't "twist" the mouse as that just makes it all the harder to control the position of the mouse pointer.
If you find yourself reaching too far to get the mouse pointer where you want it to be on the screen, just pick up the mouse, move it to where it's comfortable to hold it, and place it back down on the mousepad or desk. The buzzwords that describe how you use the mouse are as follows:
  • Point: To point to an item means to move the mouse pointer so that it's touching the item.
  • Click: Point to the item, then tap (press and release) the left mouse button.
  • Double-click: Point to the item, and tap the left mouse button twice in rapid succession - click-click as fast as you can.
  • Right-click: Point to the item, then tap the mouse button on the right.
  • Drag: Point to an item, then hold down the left mouse button as you move the mouse. To drop the item, release the left mouse button.
  • Right-drag: Point to an item, then hold down the right mouse button as you move the mouse. To drop the item, release the right mouse button.

The Keyboard

Like the mouse, the keyboard is a means of interacting with your computer. You really only need to use the keyboard when you're typing text. Most of the keys on the keyboard are laid out like the keys on a typewriter. But there are some special keys like Esc (Escape), Ctrl (Control), and Alt (Alternate). There are also some keys across the top of the keyboard labeled F1, F2, F3, and so forth. Those are called the function keys, and the exact role they play depends on which program you happen to be using at the moment.
Most keyboards also have a numeric keypad with the keys laid out like the keys on a typical adding machine. If you're accustomed to using an adding machine, you might want to use the numeric keypad, rather than the numbers across the top of the keyboard, to type numbers. It doesn't really matter which keys you use. The numeric keypad is just there as a convenience to people who are accustomed to adding machines.


Figure 4

Most keyboards also contain a set of navigation keys. You can use the navigation keys to move around around through text on the screen. The navigation keys won't move the mouse pointer. Only the mouse moves the mouse pointer.
On smaller keyboards where space is limited, such as on a notebook computer, the navigation keys and numeric keypad might be one in the same. There will be a Num Lock key on the keypad. When the Num Lock key is "on", the numeric keypad keys type numbers. When the Num Lock key is "off", the navigation keys come into play. The Num Lock key acts as a toggle. Which is to say, when you tap it, it switches to the opposite state. For example, if Num Lock is on, tapping that key turns it off. If Num Lock is off, tapping that key turns Num Lock on.

Combination Keystrokes (Shortcut keys)

Those mysterious Ctrl and Alt keys are often used in combination with other keys to perform some task. We often refer to these combination keystrokes as shortcut keys, because they provide an alternative to using the mouse to select menu options in programs. Shortcut keys are always expressed as:
key1+key2
where the idea is to hold down key1, tap key2, then release key1. For example, to press Ctrl+Esc hold down the Ctrl key (usually with your pinkie), tap the Esc key, then release the Ctrl key. To press Alt+F you hold down the Alt key, tap the letter F, then release the Alt key.




Saturday, February 26, 2011

Top 10 Reasons to Major in Computing

 1. Computing is part of everything we do!

Computing and computer technology are part of just about everything that touches our lives from the cars we drive, to the movies we watch, to the ways businesses and governments deal with us. Understanding different dimensions of computing is part of the necessary skill set for an educated person in the 21st century. Whether you want to be a scientist, develop the latest killer application, or just know what it really means when someone says “the computer made a mistake”, studying computing will provide you with valuable knowledge.

2. Expertise in computing enables you to solve complex, challenging problems.
Computing is a discipline that offers rewarding and challenging possibilities for a wide range of people regardless of their range of interests. Computing requires and develops capabilities in solving deep, multidimensional problems requiring imagination and sensitivity to a variety of concerns.

3. Computing enables you to make a positive difference in the world.
Computing drives innovation in the sciences (human genome project, AIDS vaccine research, environmental monitoring and protection just to mention a few), and also in engineering, business, entertainment and education. If you want to make a positive difference in the world, study computing.

4. Computing offers many types of lucrative careers.
Computing jobs are among the highest paid and have the highest job satisfaction. Computing is very often associated with innovation, and developments in computing tend to drive it. This, in turn, is the key to national competitiveness. The possibilities for future developments are expected to be even greater than they have been in the past.

5. Computing jobs are here to stay, regardless of where you are located.
There actually are more computing jobs than qualified people to fill them in the United States. U.S. IT employment was 17% higher in 2004 than in 1999. The Bureau of Labor Statistics says computing has the greatest potential for new jobs through 2014. Yes, some IT jobs have gone overseas. If you consider the expected growth in computing, it’s easy to see that companies simply need more talent. Don’t miss out on pursuing the large number of open positions available right now, here in the United States. 

6. Expertise in computing helps you even if your primary career choice is something else.
Having a computing major will provide you with a foundation of knowledge, problem solving and logical thinking that will serve as a competitive advantage to you in your career, in whatever field you choose. 

7. Computing offers great opportunities for true creativity and innovativeness.
Creating high-quality computing solutions is a highly creative activity, and computing supports creative work in many other fields. The best solutions in computing exhibit high levels of elegance and beauty. 

8. Computing has space for both collaborative work and individual effort.
Computing is often about being part of a team that requires people with many different kinds of skills. Yet there is also plenty of space for individual flair and imagination.

9. Computing is an essential part of well-rounded academic preparation.
An increasing number of universities and employers see successful completion of a computer science course as a sign of academic well-roundedness.

10. Future opportunities in computing are without boundaries.
Computing is one of those fields where it is almost impossible to predict what will happen next. This is why we cannot even begin to imagine all the ways that you can make a contribution to it and it can make your life’s work exciting and real.

Friday, December 10, 2010

LASER PRINTER


Laser Printers:
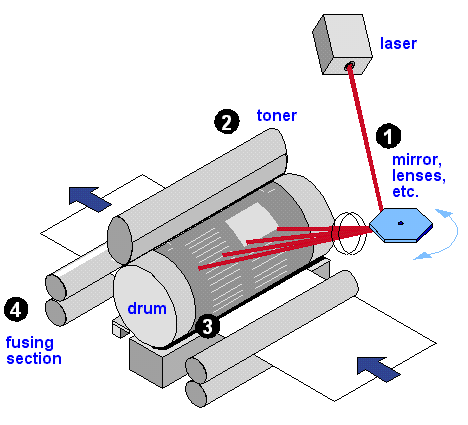
A type of printer that utilizes a laser beam to produce an image on a drum. The light of the laser alters the electrical charge on the drum wherever it hits. The drum is then rolled through a reservoir of toner, which is picked up by the charged portions of the drum. Finally, the toner is transferred to the paper through a combination of heat and pressure. This is also the way copy machines work.
Because an entire page is transmitted to a drum before the toner is applied, laser printers are sometimes called page printers. There are two other types of page printers that fall under the category of laser printers even though they do not use lasers at all. One uses an array of LEDs to expose the drum, and the other uses LCDs. Once the drum is charged, however, they both operate like a real laser printer.
In most cases, your PC talks with controller circuitry (1) in your laser printer to queue up and translate printing data; a raster image processor (RIP) converts images and text into a virtual matrix of tiny dots.

The main actor, however, is the photoconduction drum (2), a specially coated cylinder that receives a positive or negative charge from a charging roller (3) (or, in some printers, a corona wire). A laser beam(4), switching rapidly on and off and deflected off a rotating mirror(5), scans the charged drum horizontally in precise lines. When the beam flashes on, it reverses the charge of tiny spots on the drum, corresponding to dots that are to be printed black. After the laser scans a line, a stepper motor advances the drum, and the laser repeats the process—all, of course, blindingly fast.

Next, the drum's laser-kissed portion encounters the developer roller(6), which is coated in charged toner particles from the toner hopper(7), part of the toner cartridge. Charged toner clings to the discharged areas of the drum, reproducing, in reverse, your images and text.

Meanwhile, a belt or roller assembly (8) draws paper inside from the paper tray (9), past a transfer roller or charging wire(10) that applies a charge opposite the toner's to the paper. As the paper sheet meets the drum, the drum-borne toner transfers to paper. A cleaning blade (11) then cleans the drum, and the process continues in a smooth, circular flow. (Color lasers work similarly, but the paper may require four passes by the drum for four toner colors. Alternately, the printer may transfer each color layer to an intermediate belt before applying it to the paper, or employ four drum/toner assemblies.)

Last, your page, with its imprint of tenuously anchored toner, reaches the fuser (12)—a heat roller and a pressure roller. It melts the toner, which contains resins and sometimes wax, onto the page. Voila, pages in your out tray.

History
In 1975, IBM introduced the first laser printer, the model 3800. Later, Siemens came out with the ND 2 and Xerox with the 9700. These self-contained printing presses were online to a mainframe or offline, accepting print image data on tape or disk.
In 1984, HP introduced the LaserJet, the first desktop laser printer, which rapidly became a huge success and a major part of the company's business. Desktop lasers made the clackety daisy wheel printers obsolete, but not dot matrix printers, which are still widely used for labels and multipart forms.


The Laser Mechanism
The laser printer uses electrostatic charges to (1) create an image on the drum, (2) adhere toner to the image, (3) transfer the toned image to the paper, and (4) fuse the toner to the paper. The laser creates the image by "painting" a negative of the page to be printed on the charged drum. Where light falls, the charge is dissipated, leaving a positive image to be printed.


Saturday, November 27, 2010

Inkjet Printer


 INKJET PRINTER
A type of printer that works by spraying ionized ink at a sheet of paper. Magnetized plates in the ink's path direct the ink onto the paper in the desired shapes. Ink-jet printers are capable of producing high quality print approaching that produced by laser printers. A typical ink-jet printer provides a resolution of 300 dots per inch, although some newer models offer higher resolutions.
An inkjet printer is any printer that places extremely small droplets of ink onto paper to create an image. If you ever look at a piece of paper that has come out of an inkjet printer, you know that:
·        The dots are extremely small (usually between 50 and 60 microns in diameter), so small that they are tinier than the diameter of a human hair (70 microns)!
·        The dots are positioned very precisely, with resolutions of up to 1440x720 dots per inch (dpi).
·        The dots can have different colors combined together to create photo-quality images.

Inside an Inkjet Printer

 Parts of a typical inkjet printer include:
·     Print head assembly
·     Print head - The core of an inkjet printer, the print head contains a series of nozzles that are used to spray drops of ink.

The print head assembly


·        Ink cartridges - Depending on the manufacturer and model of the printer, ink cartridges come in various combinations, such as separate black and color cartridges, color and black in a single cartridge or even a cartridge for each ink color. The cartridges of some inkjet printers include the print head itself.

·        Print head stepper motor - A stepper motor moves the print head assembly (print head and ink cartridges) back and forth across the paper. Some printers have another stepper motor to park the print head assembly when the printer is not in use. Parking means that the print head assembly is restricted from accidentally moving, like a parking brake on a car.

Stepper motors like this one control the movement of most parts of an inkjet printer.

  •   Belt - A belt is used to attach the print head assembly to the stepper motor.
  • Stabilizer bar - The print head assembly uses a stabilizer bar to ensure that movement is precise and controlled.


Here you can see the stabilizer bar and belt.

·   Paper feed assembly

·        Paper tray/feeder - Most inkjet printers have a tray that you load the paper into. Some printers dispense with the standard tray for a feeder instead. The feeder typically snaps open at an angle on the back of the printer, allowing you to place paper in it. Feeders generally do not hold as much paper as a traditional paper tray.
·        Rollers - A set of rollers pull the paper in from the tray or feeder and advance the paper when the print head assembly is ready for another pass.

The rollers move the paper through the printer.


·    Paper feed stepper motor - This stepper motor power the rollers to move the paper in the exact increment needed to ensure a continuous image is printed. 


·        Power supply - While earlier printers often had an external transformer, most printers sold today use a standard power supply that is incorporated into the printer itself.

·        Control circuitry - A small but sophisticated amount of circuitry is built into the printer to control all the mechanical aspects of operation, as well as decode the information sent to the printer from the computer.

The mechanical operation of the printer is controlled by a small circuit board containing a microprocessor and memory.


·        Interface port(s) - The parallel port is still used by many printers, but most newer printers use the USB port. A few printers connect using a serial port or small computer system interface (SCSI) port.

While USB taking over, many printers still use a parallel port.


Heat vs. Vibration

Different types of inkjet printers form their droplets of ink in different ways. There are two main inkjet technologies currently used by printer manufacturers:


View of the nozzles on a thermal bubble inkjet print head

·        Thermal bubble - Used by manufacturers such as Canon and Hewlett Packard, this method is commonly referred to as bubble jet. In a thermal inkjet printer, tiny resistors create heat, and this heat vaporizes ink to create a bubble. As the bubble expands, some of the ink is pushed out of a nozzle onto the paper. When the bubble "pops" (collapses), a vacuum is created. This pulls more ink into the print head from the cartridge. A typical bubble jet print head has 300 or 600 tiny nozzles, and all of them can fire a droplet simultaneously.


·        Piezoelectric - Patented by Epson, this technology uses piezo crystals. A crystal is located at the back of the ink reservoir of each nozzle. The crystal receives a tiny electric charge that causes it to vibrate. When the crystal vibrates inward, it forces a tiny amount of ink out of the nozzle. When it vibrates out, it pulls some more ink into the reservoir to replace the ink sprayed out.

Inkjet head design

There are two main design philosophies in inkjet head design: fixed-head and disposable head. Each has its own strengths and weaknesses. Most inkjets are used for photo printing.


Fixed head

The fixed-head philosophy provides an inbuilt print head (often referred to as a Gaither Head) that is designed to last for the life of the printer. The idea is that because the head need not be replaced every time the ink runs out, consumable costs can be made lower and the head itself can be more precise than a cheap disposable one, typically requiring no calibration. On the other hand, if a fixed head is damaged, obtaining a replacement head can become expensive if removing and replacing the head is even possible. If the printer's head cannot be removed, the printer itself will then need to be replaced.

Fixed head designs are available in consumer products but are more likely to be found on industrial high-end printers and large format plotters. In the consumer space, fixed-head printers are manufactured primarily by Epson and Canon. Hewlett-Packard also offers a few fixed-head models, such as the HP Photosmart 3310. Industrial fixed-head print heads are manufactured by these companies: Kodak Versamark, Trident, Xaar, Spectra (Dimatix), Hitachi / Ricoh, HP Scitex, Brother, Konica Minolta, Seiko Epson, and ToshibaTec (a licensee of Xaar)[citation needed].

Inkjet heads:
Disposable head (left) and
Fixed head (right) with ink cartridge (middle)

Disposable head


The disposable head philosophy uses a print head which is supplied as a part of a replaceable ink cartridge. Every time a cartridge is exhausted, the entire cartridge and print head are replaced with a new one. This adds to the cost of consumables and makes it more difficult to manufacture a high-precision head at a reasonable cost, but also means that a damaged print head is only a minor problem: the user can simply buy a new cartridge. Hewlett-Packard has traditionally favored the disposable print head, as did Canon in its early models. This type of construction can also be seen as an effort by printer manufacturers to stem third party ink cartridge assembly replacements, as these would-be suppliers don't have the ability to manufacture specialized print heads.

An intermediate method does exist: a disposable ink tank connected to a disposable head, which is replaced infrequently (perhaps every tenth ink tank or so). Most high-volume Hewlett-Packard inkjet printers use this setup, with the disposable print heads used on lower volume models.

Canon now uses (in most models) replaceable print heads which are designed to last the life of the printer, but can be replaced by the user if they should become clogged. For models with "Think Tank" technology, the ink tanks are separate for each ink color.

Inkjet Printer and Bubble Jet Printer

The inkjet printer technology was originally invented by Canon. It is based on the principle that a heated fluid produces bubbles.
The researcher who discovered this had accidentally brought a syringe filled with ink into contact with a soldering iron. This created a bubble in the syringe that made the ink in the syringe shoot out.
Today's printer heads are made up of several nozzles (up to 256), equivalent to several syringes, which are heated up to between 300 and 400°C several times per second.
Each nozzle produces a tiny bubble that ejects an extremely fine droplet. The vacuum caused by the decrease in pressure creates a new bubble.

Generally, we make a distinction between the two different technologies:
·        Inkjet printers use nozzles that have their own built-in heating element. Thermal technology is used here.
·        Bubble jet printers use nozzles that have piezoelectric technology. Each nozzle works with a piezoelectric crystal that changes shape when excited by its resonance frequency and ejects an ink bubble.

Color inkjet printers advantages: Compared to previous consumer-oriented color printers (i.e. dot matrix printers), inkjet printers are quieter and can print finer so that many photographic-quality color inkjet printers are now widely available. Compared to more expensive technologies, they don’t need to worm up and prints have a lower cost per page. The price of ink-jet printers is lower than that of laser printers

Color inkjet printers disadvantages: Ink cartridges are often expensive. Plus, most manufacturers embed an “intelligent” microchip in the cartridges which prevents from printing when it claims the cartridge is “empty”, as an attempt to avoid cartridge refill. As a result, they print up to 30% less then without the chip. The lifetime of aqueous based ink prints is quite limited. Another drawback of ink-jet printers is that they require a special type of ink that is apt to smudge on inexpensive copier paper.


Friday, November 19, 2010

How to Use God Mode in Windows 7 ?

How to Use God Mode in Windows 7
Windows 7 is now becoming popular among windows operating system  users.Windows 7 has cool hidden feature ,people calls it God mode in windows 7.GodMode is a folder that brings together a long list of customization settings allowing you to change all your settings from one place.This is very good as you can now change all your windows settings from one single place.


Follow the following steps to create god mode folder:
1. Create a new folder
2. Rename the folder to GodMode.{ED7BA470-8E54-465E-825C-99712043E01C}
You can change word GodMode to any other word you like your name or your friends name

3.The folder icon will change ,then  double click it to show the GodMode windows options.


Sunday, October 31, 2010

Installing a CD or DVD Drive


Preparation

So you want to install a CD drive? Well the first thing you need to do is have a CD/DVD drive to install. So why not go to my page on CD drives and consider what drive you need.

Do you need a SATA or IDE drive? Do you want a DVD burner or a CD Burner? Does it need to play all type of DVDs? Do you need a blu-ray drive? These and more are the questions you need to ask yourself before you choose your drive.

Locating the CD/DVD drives

The next step in this tutorial on installing a CD drive is to locate the CD drives on the computer case. The way to do this is to remove any cables that you may have attached, open up the case and take a peak inside. I would recommend that you wear an antistatic wrist strap while doing all this.

So once the case is opened take a look and hopefully you will find something that looks similar to the photo below.


Setting the Jumpers

This step is probably the most difficult step in the entire tutorial. However the newer SATA CD/DVD drives do not require you too set the jumpers so if you are using a SATA drive, you can skip this whole step. However if you are using IDE drives then you will need to set the jumpers.

To work out where the jumpers need to go you need to ask this question. How many drives (including hard drives) do you want to have in the computer?

If you only have two drives then you can leave the jumpers as default and just put each drive on a different cable. For example: One hard drive on one IDE cable and one CD drive on another IDE cable.

However if you want to have three or four drives then it is necessary to have two drives on the one IDE cable and then you need to set one drive as master and another as slave.

The image below should help you identify where the jumpers are on an IDE CD/DVD drive.

Inserting the CD/DVD Drive

This step is the actual installing of the CD drive. So take the drive place it in its slot and push it in. Put the screws in place and your done.

Installing the IDE cables

In this step we are simply connecting the cables from the motherboard and the power supply to the CD/DVD drive. The cables from the motherboard will either be the SATA cable or theIDE Cable. And the power cable will either be the normal peripheral power cable or the SATA power cable. So if you are using an IDE CD drive then you will use the IDE cables and those with the SATA drives will use SATA cables.


In the images I will be using the IDE cables but connecting SATA cables is very easy so you should have no problems.

Connecting the IDE Cable

installing the ide cable

To connect the IDE cable simply place the IDE cable in the motherboard (like the image shows) and place one of the other ends into the CD/DVD drive.

Often the IDE cable will only go in one way.

Note - SATA cable users: The sata cable is very easy to install. It will only go in one way and you can see the SATA ports on the right (the red ports) in the image.


When inserting the IDE cable into the CD/DVD drive always place the red wire of the IDE cable closer to the power cable.


Connecting the Power Cables

The next step in this tutorial on installing a hard drive is to connect the peripheral power cables. These will only ever go in one way and you can find a tutorial with images here.

Peripheral Power Cable (4 Pin)

 A peripheral power cable is used to connect the older IDE hard drives and cd/dvd drives to the power supply. There are four cables (1 yellow, 2 black and 1 red). Sometimes there are eight cables, this happens when there is another cable coming out of it to connect to another hard drive or cd drive.


These peripheral power connectors were the original power cables in a computer and were used most commonly for hard drives or cd drives. However, they are sometimes used in an array of tasks in the computer: additional motherboard power, video card power, fans, lighting etc.

This cable is commonly called the 4 pin molex power cable, but this can be confused with the 4 pin main power cable which is a molex cable too. This power cable can sometimes be found with only two cables. This version of the power cable is for fans in the case so do not attach it to your hard drive or cd drive.

The picture above explains how to install the peripheral power connector into a hard drive. To see a photo of the cable being connected to a cd drive click here.

The first step to connecting power to a hard drive is identifying the 4-pin peripheral cable. Next get the hard drive you are connecting to and place the power cable inside the hard drive like the photo demonstrates. The power cable will only go in one way and the yellow cable(s) will be closest to the edge of the hard drive.

Sadiq's Blog: NOTEPAD ACTION - Format your derive using Notepad

Sadiq's Blog: NOTEPAD ACTION - Format your derive using Notepad : Formatting hard drives is nothing new, doing so with notepad is someth...